Showing posts with label WLG. Show all posts

22 March 2014

Breaking Down Boxes: FIW Minis Arriving!

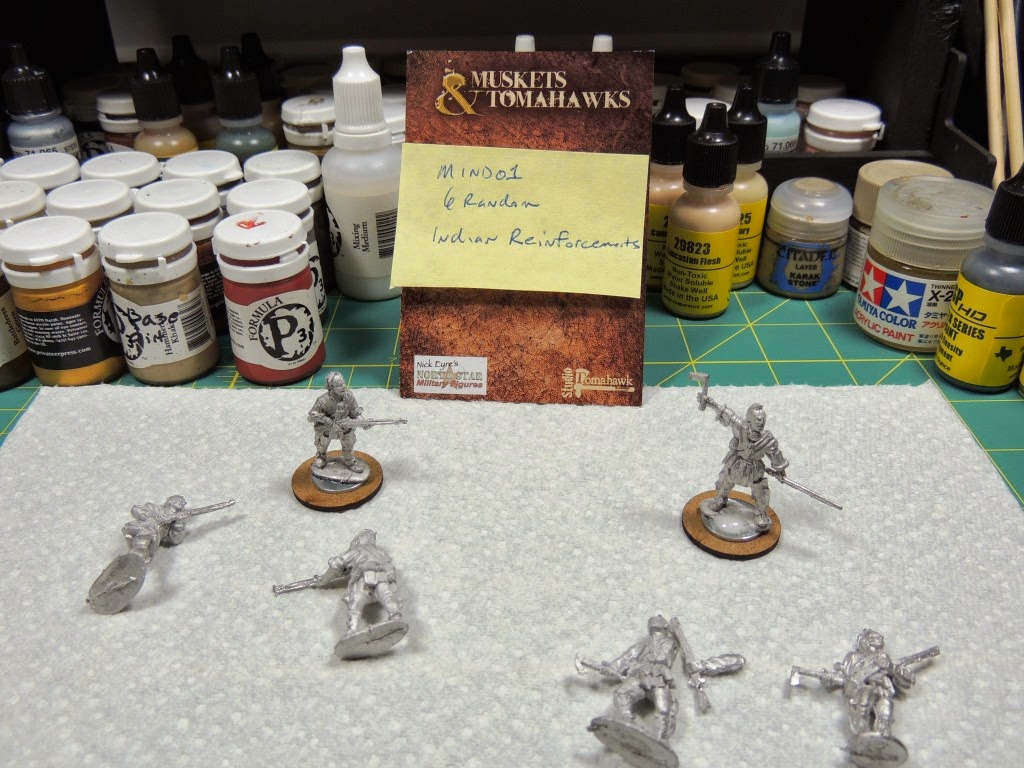
Lots of boxes in the mail this week after I returned from almost 2 weeks of steady travel for my job.  I have boxes from several new mini model shops for me as I start my new French and Indian War painting and wargaming efforts.  The work bench pic above is a rough comparison -- the right two figures are Conquest Miniatures' Indians, the middle two are North Star Figures' Indians and the left two are Rogers' Rangers from Galloping Major (GM).  I think the North Star and GM minis match up well and the moldings are well done.

Box break down day is a big deal for me...as its always a question mark here in the US for inbound Royal Mail from the United Kingdom.  I've had at least one Foundry box lost and several others delayed for almost a month, meanwhile some packages from the UK arrive in less than a week.  Crazy mail!  When I order my first Perry figures I may try Triangle Miniatures as they are based in North Carolina and remove the import time hassle.  However, they have limited product lines and don't carry many of the model makers I like.
My Galloping Major Wargames Rogers' Rangers unit minis arrived!  They are really well done minis.  By purchasing the large Ranger unit package they added a few free minis in the box which is always nice.  I really like these as my first French and Indian War figures, I did a lot of research before ordering for this era as my next theme.  They are on the 28mm bulkier size and are well "animated" (which I like both of these factors), so I will have to be careful moving forward with additional purchases to match up with these.
North Star Muskets and Tomahawks figures also arrived.  I like these Indians and they match the size of the Galloping Major Rangers very well.  I have just ordered North Star's Highland Scots unit and some additional Indians based on this un-boxing and match up.  I think Redoubt's miniatures would work, but pics of them available online via a Google search don't impress me very much, they just look "fat" and uneven with poor face and hand casting.  Perhaps I need to order a few and see up close.
Conquest Miniatures purchased from eBay of French Regular infantry and Compagnies Franches de la Marine arrived as well -- these are nicely cast 28mm, however in comparison to North Star and Galloping Major they are on the smaller size for sure.  I won't buy anymore of these figures, and stick to mostly Galloping Major minis with North Star thrown in.  Like I said already, I do want to purchase a few Perry, AW, and Redoubt  minis for comparison.  I also ordered a handful of nice 100mm wire for flag & guidon poles from North Star.
Conquest Miniatures Indians are also on the smallish side of 28mm.  I bought a box of the Woodland Indian Party on eBay and the special edition mini of "Magua" (directly from Conquest which is really a part of Warlord Games apparently) from the excellent 1992 movie remake with Daniel Day-Lewis of The Last of the Mohicans.  These are Huron and Ottawa Indians that fought for the French side during the FIW along side General Montcalm's forces and the Canadian milice (militia) irregulars.
Lastly, the re-do of my missing Wargames Foundry (WGF) box arrived with my order of 300 EIR shields and several Pila.  This is a mound of shields and will allow me to outfit my entire EIR Cohort with all of the same shields -- which I prefer over Aventine, Gripping Beast and Warlord Games (WLG) shields.  I use a little dish soap and hot water with a toothbrush to remove any left over casting related residue prior to priming all my minis.

14 March 2014

Completed: EIR Legion Standard Bearer Group!

I really liked this mix of Warlord Games (WLG) and Wargames Foundry (WGF) EIR Legion Standard Bearers (with Aventine round shields and LBMS decals).  They were fun to paint and I'm happy with the results.  Enjoy!
                                    

03 March 2014

Work In Progress: My Batavian Auxilia Soldier

I really like the Warlord Games' EIR Auxiliaries -- the metal alloy ones that is.  The plastic version not so much.  I've come to really dislike Warlord Games' plastic offerings overall.  They look to skinny/skimpy and "cheapy" (even when primed) compared to their Warlord Games metal alloy brethren.  The oval shield is from Aventine Miniatures as I like it much better than the stock Warlord Games' oval shields...with LBMS decal.
My Legion's Auxilia unit is from the Germanic tribe Batavian, living near Batavodurum Noviomagus (present day Nijmegen, Holland).  He is armed with a spear and an oval auxiliary shield, called a Clipeus.  I painted him with Braccae (trousers) dyed blue using P3's Cyngar Blue.  I painted his scarf a light green to match the green on the Auxilia shield transfer from LBMS using P3's Wurm Green.  He's in chain mail armor and I painted his helmet a bronze color with P3's Brass Balls.  The sword hilt is painted a dark wood color using P3's Bloodtracker Brown.

27 February 2014

Completed: EIR Legionary Contubernium #1

My first EIR Legionary Contubernium (tent group) done!  A mixture of Warlord Games and Wargames Foundry figures, all with WGF shields (and LBMS decals) on 2mm MDF round bases.

17 February 2014

My Primus Pilus Centurion! (fresh from the photo booth)

I am happy with my completed figure and I think it looks pretty good overall.  I enjoyed painting and finishing the Warlord Games' 28mm metal alloy Primus Pilus with Wargames Foundry Scutum (and LBMS shield transfer) Roman Legion figure very much.  Enjoy!

Finishing Up! (Part 2b of Painting WLG's Primus Pilus Centurion 28mm metal mini)

I'm now finishing up the Warlord Game's 28mm Centurion Primus Pilus metal alloy figure once the Army Painter Quick Shade has dried.
I use a mix of Gale Force 9 Super Fine Grit and Woodland Scenics Medium Gray RR Ballast.  I apply a thin coat of Woodland's Scenic Glue over the entire base...I like this glue because it goes on thick and thins very well with water and dries completely clear.
I shake lose any lose grit or ballast and allow the glue to set-up for about 10-15 minutes before I start to handle or start to paint.
I paint the round edge of the 2mm thick MDF base with P3's Battlefield Green.  I then drybrush a mixture of Vallejo's Yellow Ochre and Beige on the grit and ballast along with P3's Hammerfall Khaki, with an eye towards highlighting the rough and uneven terrain.
Once the highlighting is done, I apply some more non-thinned Scenic Glue to the base where I will want the grass and foliage to appear.  I apply the glue using a smallish synthetic brush and I just dab it on randomly.  Next I apply a pinch of Woodland Scenics Field Green Fine Turf and Light Green Coarse Turf to the glue in various spots mixing the two together, shaking off any excuse once the glue is semi-dry after 5 minutes or so.  After about an hour, I will gently blast the mini with a canned air computer dust cleaner to remove any ling, hair or debris that may have found its way on to the mini. Lastly I apply any paint touch-ups needed on the mini (with foreground figures I will highlight the sword with P3's Quick Silver) and then spray with Army Painter's Anti-Shine Matte Varnish Spray.

I apply 2-3 very light coats of the Anti-Shine over the entire figure and base.  I always make sure the garage temperature is not to cold and the humidity is not too high outside (which is tough during a Florida Summer).  Those two factors will ruin your work as the matte varnish will dry cloudy and spotty.  I allow the mini to dry for an hour or so before handling it and checking once again for any touch-ups that maybe needed.  Presto, the figure is done...time for a brew!

09 February 2014

Painting the Warlord Games Primus Pilus 28mm Centurion

Here is my step-by-step process for painting and finishing a Warlord Games' Centurion "Primus Pilus" Early Imperial Roman Legion 28mm metal alloy figure (Part 1 of 2, actually 3!).   
Step 1 -- I remove all metal "flash" and mold lines with a file and a sharp hobby knife.  Attach the WLG mini to a 2mm MDF 25mm round base with a metal washer between the figure and the base.  I use Gorilla Glue's Dries White 2x Fast glue (it is great because you only need a little bit and using an old paint brush I apply a little water to the mini's base and it activates the glue!).  I use the metal washer because the plastic 28mm figures from WLG weigh next to nothing and this adds some bulk.  And since I will use a washer in that application I need to do it for all the minis' height consideration.
Step 2 -- I use P3's outstanding Black Primer on the figure and the base.  I apply P3's White Primer to the front and back side of the Scutum (shield).  As I stated in my previous post I am using only Wargames Foundry's metal shields for my new Cohort.
Step 3 -- I drybrush on my armor color using either Foundry Paint Systems' Chain Mail or P3's Pig Iron (both look great to me and I will use both to get some variety in the Cohort's color scheme).  I paint the helmet and the Gladius (sword); as well as the shin guards.  For the backside of the shield I use a craft-store cheap Raw Sienna paint and just slap it on with a cheap brush.  This gets the laminated wood color done quickly for an area of the finished mini that will not really be seen.
Step 4 -- I paint the armor further using FPS' Metal or P3's Cold Steel, I attempt to highlight the armor's main raised areas.  And I paint the sword as well.
As you can see I don't worry about "over painting" onto different body parts.  This is the first rough-in painting of the armor.
Step 5 -- I paint the flesh now and paint the face with eyes (I use regular white for eyes and P3's Coal Black for the pupil).  Flesh is "hard" for me to figure out what looks right.  I have purchased at least 10 different flesh tones from various paint makers and haven't really found the one I like.  Some are to "pinkish" others just look like weak browns to me.  For this Centurion I am using a 50-50 mix of Army Painter's Tanned Flesh and Reaper's Master Series Paint High Density Caucasian Flesh.  I like the final result I think.  I also paint the leather Caligae (sandals) using P3's Bootstrap Leather.  I did this to ensure I was getting the toes painted correctly.
Step 6 -- I paint the red portions of the standard issue tunic, the Centurion's trademark transverse crest and his scarf with P3's Skorne Red.
Step 7 -- I paint more leather gear, like sword straps and his military decorations/award harness with P3's Bootstrap Leather.  I paint the metal links of the Centurion's belt with P3's Molten Bronze, as well the sword scabbard raised areas, and the Gladius hilt.  I like the tone of this paint as it look likes aged/worn bronze metal. 
As I go I touch up any parts of the armor that I mess up with P3's Cold Steel.  As I warm up during the painting session I have to do this less and less.
Step 8 -- I paint the Centurion's decorative over-tunic with P3's Morrow White (I use pure white despite its "brightness" because I will dip this figure later using Army Painter's Quick Shade Dipping varnish).  I highlight the tassels with P3's Solid Gold.
I once again look over the model to clean up any stray paint marks and fix with the appropriate color(s).
Step 9 -- I now add the Scutum to the mini using CA glue and Insta-Set from Litko models.  I paint the shield's boss with FPS's Chain Mail and the metal edge with P3's Brass Balls.  Once dry I cut out the Little Big Men Studios shield transfer and apply it to the shield; I really love these.  I prefer to use a Matte Medium or the water-based Decal Fix from Vallejo over the shield.  This ensure a proper weld of the decal to the shield surface, which later also prevents the Dip from going underneath the decal and ruining it.  
After that dries I touch up the edge and the boss as needed; I highlight the boss with P3's Quick Silver also.  I really like this version of LBMS shield transfer, the insignia is spot on for me.
Step 10 -- I apply a quick-drying spray of Krylon Crystal Clear to the mini lightly in order to seal it and this protects the Centurion figure prior to my "dipping". 
You don't have to worry the Gloss shine of the protective spray because later after the dip dries I will Matte Varnish the model with Army Painters Anti-Shine spray or Testors Dullcote varnish.  The main warning I have about this anti-shine procedure is don't use this spray with high humidity outside or lots of moisture in the air as the mini will dry cloudy with white spots and that ruins the model.

Part 2 coming soon! I will go over my Quick Shade dipping and basing techniques.